Okay then. Let’s move on, because this book ain’t gonna publish its self.
By now, you should have everything you need in hand.
The cover from the designer should be ready, the final document should be error free and with all the correct formatting to be uploaded. Moreover you should also have made your research on keywords and categories you are going to use in order to boost your sales even more.
So it’s about time to publish that book we have started to work together about “Drawing”, remember? Of course you are. So here how it’s done step-by-step.
Creating your first eBook
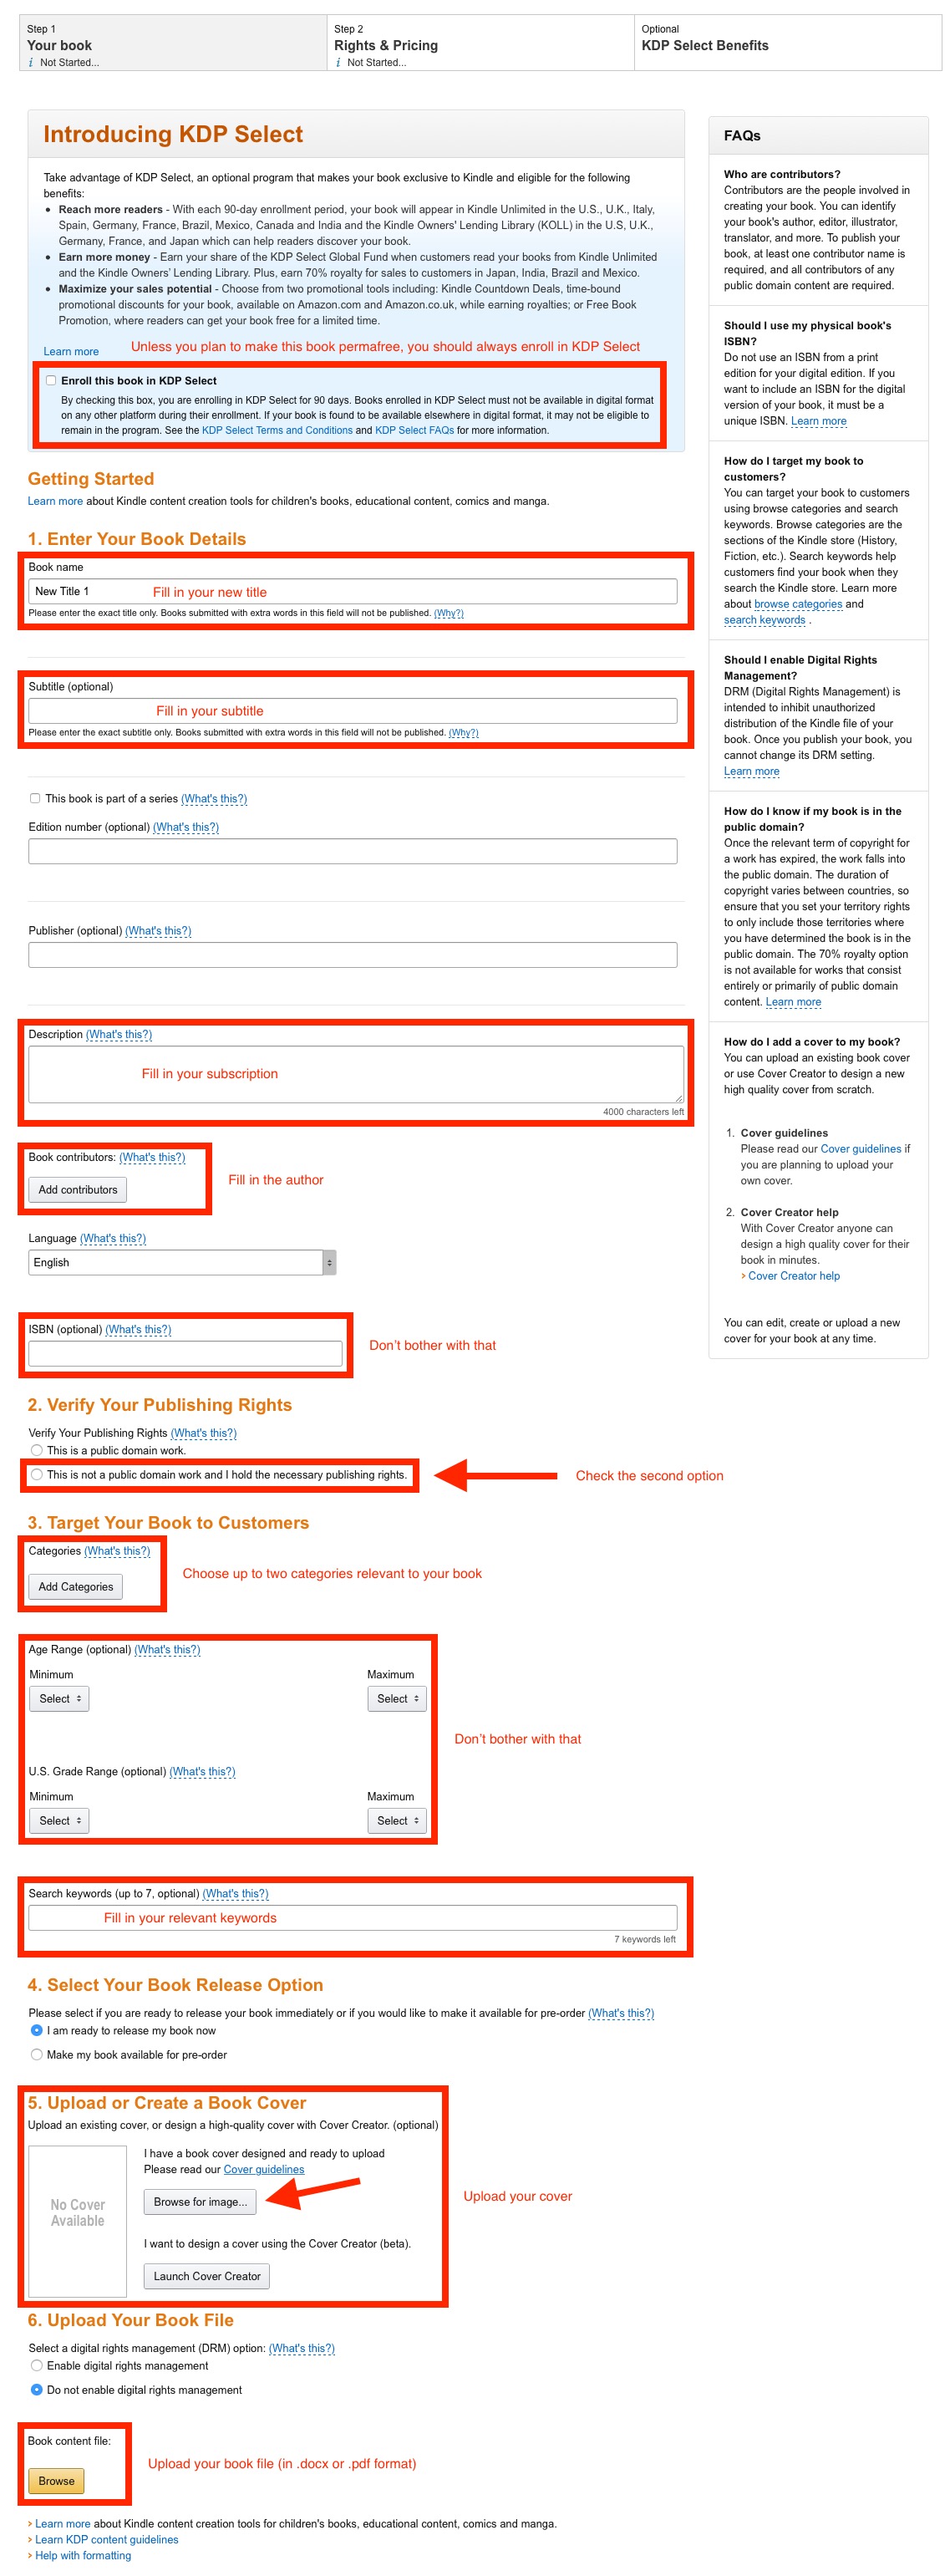
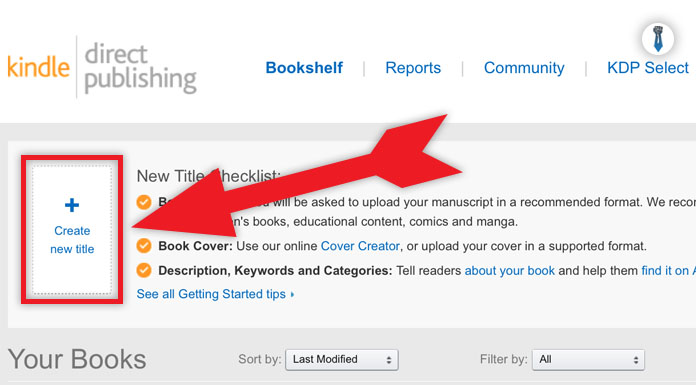
First of all, log-in to your KDP account and go to your bookshelf page. On the top, you will see where it says “Create new title”. Then all you need to do is fill in the blanks accordingly.

➠ Enroll for KDP Select (unless you plan to make this book permanently free)
➠ Fill in the Title
➠ Fill in the Subtitle
➠ Fill in the Series (if it is a part of a series): It’s best to include your main keyword once more in the series section. It’s not a big factor but every bit of help counts.
➠ Description: In the description section you will need to pay attention in some specific areas like:
- Grab reader’s attention
- Provide a promise (non-fiction)
- Give an introduction of what is following in the book
- Provide bullet points of the benefits of the book (non-fiction)
- Watch out for the HTML formatting tips
You can download the complete template of the description I use for my book from the resources section.
➠ Book contributors: Here is where you will choose your author’s name or “Pen Name.” Try to make it as realistic and friendly as possible. Some name which is pretty common and it will create somehow positive feelings to anyone who will read it.
➠ Publishing rights: Here choose “This is not a public domain work and I hold the necessary rights.”
➠ Choose your categories: Look for relevant but not very competitive categories. Always have in mind that if your book ranks within the first twenty for any category it will get a much bigger exposure.
➠ Fill in your keywords: Use Amazon keyword tool in order to determine relevant keywords for your book. For example, if your primary keyword is “drawing”, some other relative keywords might be: “drawing for beginners”, drawing manga”, “how to draw”, “how to draw people”, etc.
➠ Upload your book cover: Here is where you upload the book cover you got from your designer.
➠ Upload your book file: This is where you upload your final eBook document. Acceptable files are .docx, .doc or .pdf.
➠ Preview your book: You must absolutely not skip this step. It’s very important. After you upload your book, you will have to wait for a few minutes in order to be uploaded and converted to .mobi format.
After it’s done, press the “Preview” button. KDP will ask you if you want to save and proceed to preview. Click “Yes”. Preview your book closely, check for any spelling or formatting errors. This is the last time you will be able to make corrections before you publish the book.
Of course, if you miss an error you will have the chance to upload a new file for this book. But why bother if you can make a nice double check in this section.

➠ Choose your royalties: Depending on your niche or your overall strategy this is where you will tell Amazon how much to sell your book. Between $2.99 and $9.99, you will get paid 70% royalties on every sale. Below $2.99 or above $9.99 your royalties will drop to 35%.
This is a tricky point actually because it really depends on the niche, the quality of the book, the competition etc. As a general rule of thumb, I would suggest that non-fiction books of more than 60 pages perform well at a $2.99 price point.
On the other hand, if you got a fiction series you might want to try a strategy of each book costing $0.99 and make series of 6 to 10 books.
Your best bet here is to “copy” the pricing method of your “model book” and act accordingly, you might want to start as he/she has done and make adjustments/improvements on the spot.
Some other options you might want to consider are to give your first book of the series as a perma-free book and then end it with a cliffhanger. Then as you publish more books in the series, you can gradually increase the price first to $0.99 and then to $2.99
➠ Check allow lending of this book: This is an option to let Amazon lend your book to a relative or a friend under some circumstances. We always need to check this option as we need as much exposure as we can get.
➠ Wait for the royalties to come: Now for the sweet part. After you hit publish you will need to wait for up to 24 hours before your book becomes available in Amazon Kindle store. But usually, it takes less.
After your book goes live, go to the front end and check everything out. You want to make sure the front end of your book is perfect. It needs to be error free, with correct spacing, correct headings usage and a nice clean and informative description.
This pretty much sums up the whole publishing process. I tried to make it as clear and transparent as possible, in order not to have any blank spots and misinterpretations.
Let me know in case you have any questions, in the comments section below.
*As a final note, because you often ask me what is the exact methodology I use, the authors, the designers and the exact promotion techniques I utilize in Kindle Publishing, I decided to put together a thorough program, in which I explain in every detail (videos, scripts, resources), the exact same method I use to get these results.
In case you are interested, this is the program I have put together. Thanks!


